You’re thinking about getting a compost bin, and you’ve read about making your bin instead of buying one from a hardware store. After a quick Google search, you’ve decided you want to make a chicken wire composting bin. Keep reading to learn how to create one.
Chicken wire isn’t the only material you can use to make a compost bin. You can create one from wooden pallets or hardware cloth. For this article, we’ll focus on how to make a compost bin out of chicken wire. The first thing you want to do is make sure you have all the necessary tools to make your compost bin:
Find a location for your compost bin. You want to make sure you can access it easily, and you don’t want to have it in the shade. Once you find a spot, you’ll need to prepare the ground. You can do this by laying cardboard or a piece of non-woven landscape fabric on top of the compost bin area you plan to build.
The cardboard or other material will prevent weeds from growing under the bin.
Remove the chicken wire from its packaging carefully, keeping any wire used in the packaging aside for use later. Once you have removed the chicken wire from its packaging, the next step is to lay it down curl-side up on the ground. You’ll need to put two heavy objects on each end to keep the chicken wire down. You’ll stretch the wire and prevent it from tightly curling while making the final shape.
Cut the wire or string you’ll be using to secure the compost bin. The number of ties you need and the length of the pieces will depend on the thickness of the chicken wire. You want to ensure that the ties have enough size so you can wrap them around the stake. You need enough ties to loop through the wire to support the stake to your compost bin.
Put the wooden stake at one end of your chicken wire, leaving two inches out from where the chicken wire ends. You’ll want to cut a part of the remaining two inches to a point since that will be the part that goes into the ground.
While holding the end of the wire with the wooden stake, you need to slowly roll the chicken wire until the stake is tightly wrapped. You’ll want to cover the wire ties around the stake, looping it twice through the chicken wire. You need to knot the ends, twisting the remaining wire together and pushing it inwards to where you want the center of your bin to be. It’s essential, to avoid injury, that you make sure no wire is sticking out.
Pick up the stake and chicken wire carefully while pulling the wire out and from you. You’ll then want to push the stake into the ground, stopping when the bottom of the chicken wire touches the ground. This step may require an extra set of hands or a mallet. Once the stake is secure, you can form the chicken wire in the shape you want for your bin and trim any unneeded excess.
You’ll want to lay the end of the chicken wire directly on top of the wire to the other end of the stake and close it securely using the extra wire.
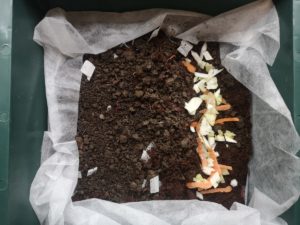
To get your compost bin started, you’ll need things that you can find in your garden as well as your kitchen. You can use yard waste, like twigs from cut branches and the leaves that you rake in the fall. In addition to yard waste, you can add some kitchen waste to your compost bin as well.
Green waste that you can add to your compost bin include the following:
We should caution you that not all yard waste should go into your compost bin. If you have a diseased tree or plant that you’re getting rid of, you shouldn’t keep that waste in your compost bin. If you’re going to be using the compost for your garden in the future, you don’t want to be using contaminated yard waste.
If you want to give your compost a boost, worms are a great addition to your compost bin. Worms love to eat leaves, and they leave behind castings that create nutrient-rich soil.
Not all kitchen waste is created equal. You’ll want to avoid composting any meat, fats like oil or butter, dairy products, and bones. The food scraps from meat or dairy are attractive to compost bin raiders such as raccoons and rats. If you don’t want to have a constant battle with the scavengers, you’ll keep your compost bin free of these types of waste.
Here are some of the frequently asked questions we get about chicken wire composting bins:
Hardware cloth is sturdier than chicken wire, so it doesn’t bend easily. Hardware cloth consists of a galvanized welded material, making it durable. Hardware cloth has a more robust gauge metal than chicken wire. If you’re shopping around, you’ll see that the hardware cloth has a smaller gauge, and the lower the gauge, the stronger the mesh.
If you’re using hardware cloth to protect your composting bin from critters, you’ll need to bury it at least 12 inches into the ground to prevent the scavengers from digging up your compost from below.
There are many things that you can throw into your compost bin. The list of acceptable items includes the following:
While there are lots of items you can put in your compost bin, the following are items that you should never put into a compost bin:
Making your chicken wire composting bin can be easy if you have suitable materials on hand. Having an extra set of hands to help you build it will make it an easier task. Once the bin is complete, you can start creating compost for future gardens with ease and in a cost-effective way.


We provide a platform supported by gardening enthusiasts to share unique experience and knowledge.
We’ve pledged 5% of sales to the program which help more families have opportunity to have garden.
Every action we make has an impact on planet. Learn more about Million Compost Movement.
Join facebook community to connect, share passion and get support when you need.
Keep in mind that we may receive commissions when you click our links and make purchases. However, this does not impact our reviews and comparions. We try our best to keep things fair and balanced, in order to help you make the best choice for you.
As an Amazon Associate, we earn from qualifying purchases.
Sign up for gardening tips, activism awareness, exclusive offers and more!
© Garden Guidepost

Gardening tips, activism awareness, exclusive offers and more!