You can use a 5-gallon bucket compost bin if you lack the space or time for a large one. A DIY compost bin with a 5-gallon bucket is simple and does not cost a lot of money. In this guide, we will introduce you how to do 5 gallon bucket compost.
Before you jump into the task of making your DIY compost bin, you want to gather all the necessary supplies. Here is the materials that you will need:
By following these five simple steps, you too can have an easy-to-use, space-saving compost bin.
Drill or punch several holes on the bottom of the bucket, around the bottom half, and through the lid. This way, your compost bucket has enough air circulation for all of the matter to decompose properly.
Arrange sticks or wooden dowel rods across the bottom, so the matter does not sit on the bottom and block the air holes. They should fit tightly across the bottom and not be rolling around loosely to be effective.
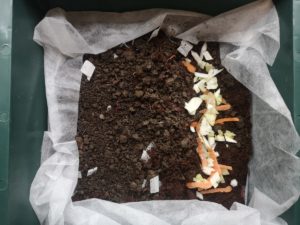
Start adding your brown and green matter on top of the sticks in layers. Do not fill it too full since you need air circulation.
Sprinkle a handful of regular dirt on top of each layer in your compost. Stay away from packaged potting soils since they are sterile, and you want to ensure you include those healthy microorganisms you find outdoors.
If it is too dry, sprinkle a bit of water halfway through your layers.
Tightly secure the lid and leave it in a warm place but where it will not become too hot. Heat will help break down the organic matter quicker.
Shake or roll the bucket around on the ground sideways each time you add a layer to your 5-gallon compost. This action helps aerate the contents and distribute the heat evenly.
If you want to try your hand at worm composting, you can easily create a setup with 5-gallon buckets.
Here are the supplies you need for a worm bin:
Drill or punch several holes on the bottom of two buckets and through the lid. The holes should be large enough for your worms to work their way through; a 3/16 bit works best. Make small holes in the sides of the buckets near the top to promote air circulation.
Use the bucket without holes for the bottom. This one will catch any excess liquids, which creates a compost tea, perfect for watering your plants.
Stack a 5-gallon bucket with holes inside and layer damp paper shreddings, cardboard, and other organic matter to reach three or four inches per layer. Next, add your composting worms, close the lid tightly, and let them do their work.
Continue to add kitchen scraps to this compost pile as the worms break down the matter. Finally, it’s time to add the third bucket when the matter inside is mainly broken down.
Remove the lid from the second bucket and place the third bucket inside. Fill the bottom three to four inches with damp paper or cardboard and organic material. Secure the lid on top, and the worms will work their way up through the holes for more food.
Remember to harvest the compost tea in the bottom bucket regularly so it does not smell. Once the worms migrate to the top bucket, you can gather the nutrient-rich matter from the first bucket with holes.
As you empty this bucket, it can cycle through and go on top of your stack to continue the composting cycle.
Recommended reading: The Ultimate Guide to Vermicomposting
Do you have any further questions? Take a look at what others are asking.
One 5 gallon bucket requires about half a pound of red wiggler compost worms. This amount will equal approximately 500 worms total.
Depending on your composting routine, it can take anywhere from six or eight weeks to upwards of six months to compost your organic material in a bucket.
You want your compost to remain moist and not dry out. Although many food scraps will bring moisture to the bucket, you should check it periodically and add a small sprinkling of water if necessary.
A compost bin does not need sunlight, but it does need to stay warm to work more effectively. If it gets too hot in the sun, it can cause damage to your compost and encourage mold growth.
A compost bin requires air circulation to work correctly. Without air holes, the matter will not break down correctly.
Setting up a 5-gallon bucket compost bin is inexpensive and easy to do. Once you begin the process, there is hardly any work to maintain it. In no time, you will see the results of your hard work, and so will your plants.


We provide a platform supported by gardening enthusiasts to share unique experience and knowledge.
We’ve pledged 5% of sales to the program which help more families have opportunity to have garden.
Every action we make has an impact on planet. Learn more about Million Compost Movement.
Join facebook community to connect, share passion and get support when you need.
Keep in mind that we may receive commissions when you click our links and make purchases. However, this does not impact our reviews and comparions. We try our best to keep things fair and balanced, in order to help you make the best choice for you.
As an Amazon Associate, we earn from qualifying purchases.
Sign up for gardening tips, activism awareness, exclusive offers and more!
© Garden Guidepost

Gardening tips, activism awareness, exclusive offers and more!